 Table of Contents
Customizing a PDF Design Tutorial
Imagine a project requirement demanding a final output in a single PDF booklet format. Fulfilling this requirement is easy by utilizing the New Booklet option. This tutorial will guide you through configuring booklet settings. The advantage of this option is its ability to create booklets without requiring specific authoring tailored for booklet purposes.
Let's begin by creating a booklet and defining its properties.
- Click New Booklet button on the Project ribbon tab.

This action triggers the creation of a new booklet and opens the booklet Settings for editing. Here, you can customize settings according to your project preferences. - Enter the name you want for your project in the Name field and the title for your documentation in the Documentation Title field.

- Select Pdf settings option. Here, you can configure the document properties such as subject, author and keywords.

- Enter the subject of your document in the Subject input field.
- Enter your name in the Author input field.
- In necessary, enter keywords for your document in the keywords input field.
- Check Embed Fonts checkbox if you want to ensure that all font information in your document is secured in your final deliverable PDF.
- Check Compress Images checkbox if you want to reduce image sizes, then proceed to select your preferred image quality.
-
The next step involves adding topics to a booklet using the Content option. Here, you determine the content to include in the booklet. The default settings in the Content option is to include all items listed on the project table of contents. This option includes everything already present in your project's table of contents, maintaining the existing structure. However, if you want to include only specific items in the booklet, you will need to select the alternative option include a specific set of items. This feature is particularly useful for creating multiple booklets, rather than replicating the overall project structure. It is an ideal approach for creating getting started guides or tutorials. To learn more about these two options, check Booklet Fundamentals.
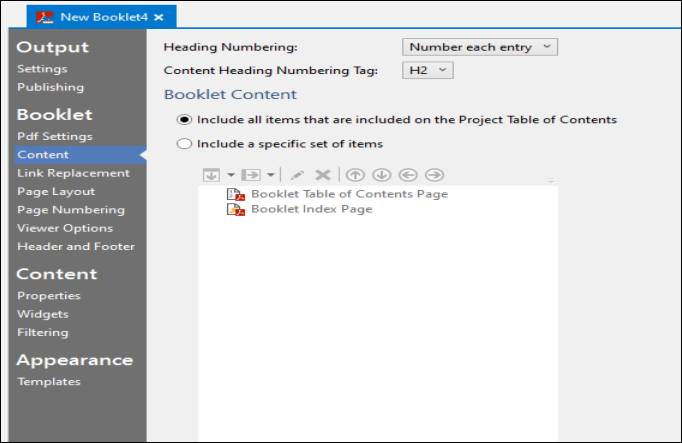
- Select Include all items that are included on the Project Table of Contents option since you need to deliver a single booklet output.
- By default, most links in the generated PDF are automatically converted to readable text. All you need to do is just make sure that all the relevant options are selected in the Link Replacement menu.

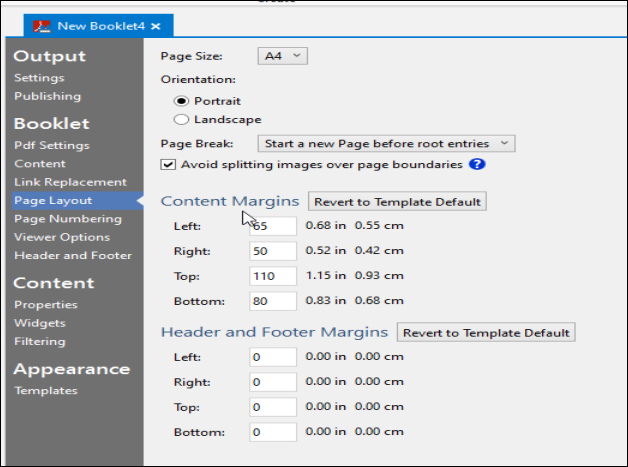
- In the Page Layout option, you have many options available to determine how the PDF appears when the end users open it initially. For the tutorial's purpose, let's explore some of these layout options to understand how they affect the initial view of the PDF for end users.
- Select Page Size as A4.
- Select Orientation as Portrait.
- Select Start a new Page before root entries option for Page Break.
- Check Avoid splitting images over page boundaries checkbox to avoid the image split.
- If you want to give any specific value for the content, header and footer margins you can give it under Content Margins and Header and Footer Margins fields. The margin values are set by default according to the project template you are using.
- In the Page Numbering option, you have the options to select where your page numbers begin in the PDF. Here are your choices:
- Select Start on Page 1 if you want the numbering to start from the very first page of your PDF.
- Select Start on First Contents Page if you want the numbering to start from the initial contents page.
- Select Start on a Specific Page Number if you want to start the numbering from a particular page of your PDF.

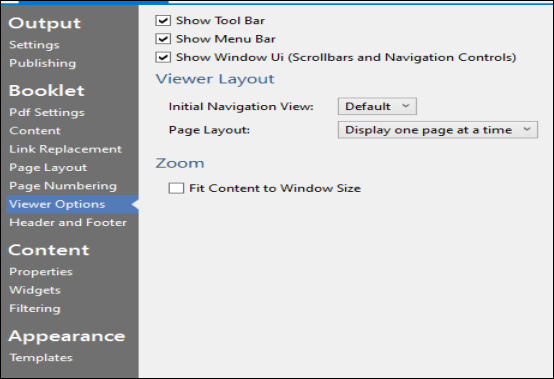
- In the Viewer Options, you have the options to define the default viewer options in the PDF such as toolbar, menu bar, and windows UI. Here are your choices:
- Check Show Tool Bar checkbox if you want to display the tool bar in your PDF.
- Check Show Menu Bar checkbox if you want to display the menu bar in your PDF.
- Check Show Window Ui checkbox if you want to include the windows UI in your PDF.
- Select Initial Navigation View as Default and Page Layout as Display one page at a time.
- Check Fit Content to Window Size checkbox if you want to fit content to window size in your PDF.
- In the Header and Footer option, you can input the content that you want to show up in your PDFs header and footer section.
- In the Templates option, select a template from the Default Template Family that you want to apply to your PDF.
This template is what determines how your PDF will look.
Congratulations! You have completed the creation of a new booklet build profile with essential settings. Let's proceed with customizing the header and footer sections: Customizing Header and Footer for Booklet.
If you want to publish your output to a website, server, or network share, utilize the Publishing option. To learn more about publishing, refer Publishing Overview.