 Table of Contents
Topic Fundamentals
Create and Manage Topics and Topic Categories
Create a New Topic
Select keyboard shortcut Ctrl+T to create a new topic.
or
Click the  New Topic button on the Project tab.
or
Click the  New Topic and Table of Contents Node button on the Table of Contents Layout editor toolbar to create a topic and a related table of contents node in one operation.
or
Select an existing topic on the Project Explorer and click  Clone on the context menu to create a new topic that is a copy of that existing topic.
or
Right-click on a specific topic category and click New Topic from the context menu to add a topic to that category.
Change Topic Properties (Name, Status, Title, Page Type etc.)
- Select the topic or topics in the project explorer.
- In the properties window, edit the required properties. The changes take effect immediately.
Create a New Topic Category
- If you want to add a new topic category below an existing topic category, first select the topic category in the Project Explorer.
- Click the
 New Topic Category button on the Project tab.
- The New Topic Category is created and selected on the project explorer. The new project explorer entry is now in edit mode, and you can change the name of the new topic category.
Rename a Topic Category
- Select the topic category on the project explorer.
- In the properties window, type the new Name for the topic category.
Move a Topic or Topic Category
- Select the item or items you want to move.
- Drag and drop them to the new required location on the project explorer. A drop indicator highlight appears as you drag the items around the project explorer, indicating where the items are moved to if dropped.
- or -
- Use the Move Up and Move Down buttons to re-order topics within a topic category, or topic categories within the parent topic category.
Find a Topic or Topic Category
- Select
 Find button on the project explorer.
- Enter part of the name or title of the topic or topic category you are looking for and press enter or select Find button in the edit box.
The tool selects the first match on the project explorer. - The first match is selected on the project explorer. Press enter or click the find button in the edit box again to find more matches.
Topic Links, Images, See Also Links, and Keywords
Add a Hyperlink to Topic Content
- Move the edit cursor to the point in the Topic content where you want the hyperlink to appear.
- Select the existing text that you want to use as the link caption for the new hyperlink.
- On the Content Authoring tab, select the Hyperlink button.
or
Use the Hyperlink HotKey (Ctrl+K). - In the Link Designer dialog, select the target and enter the link caption for the new hyperlink.
Insert an Image in Topic Content
- Position the edit cursor at the point in the Topic content where you want to insert an image.
- On the Content Authoring tab, select Image....
- In the Select Image dialog, select the image you want to insert.
- Select OK.
If the image you select is a thumbnail (the filename with the extension ends with _thumb), the image is inserted as a dynamic image widget so that users of your content can enlarge the image in place.
To create a thumbnail for an existing image, right-click the image in the project explorer and select Create Thumbnail.
Add a See Also link
Select See Also Links on the topic editor View bar and click the  New toolbar button.
or
Click the New button next to the see also section at the end of the topic content in the topic editor.
The link designer dialog displays allowing you to choose the target and caption for the new see also link.
Add an Index Keyword
Select Index Keywords on the topic editor view bar and click the New toolbar button.
To Enable or Disable Automatically Generated Index Keywords for a Topic
An Auto Index option automatically generates an index keyword for the topic, using the topic title.
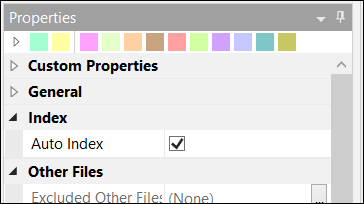
By default, Auto Index property is selected in the Properties section. You can disable this option if you do not want auto index keywords to be generated. To disable the auto index keywords generation for a specific topic:
- On the Project Explorer, select the Topic for which you want to prevent the automatic generation of an index keyword.
- In the Properties window, clear the Auto Index checkbox.

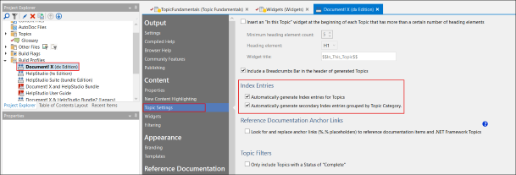
In addition to the auto index keyword generated from the Topic Title, HelpStudio can also generate an additional hierarchical keyword based on the Topic Category. When this option is enabled (on the Topic Settings page in the Build Profile Editor), a top level keyword is generated for the Topic Category, which contains an auto index keyword for each Topic in that Category.
By default, auto index keywords and secondary index keywords are selected in the Topic Settings page in the Build Profile Editor. To disable the auto index and secondary index keywords generation for the entire project:
- Select the required Build Profile.
- In the Topic Settings, clear the Automatically generate Index entries for Topics checkbox.
- Clear the Automatically generate secondary Index entries grouped by Topic Category checkbox.
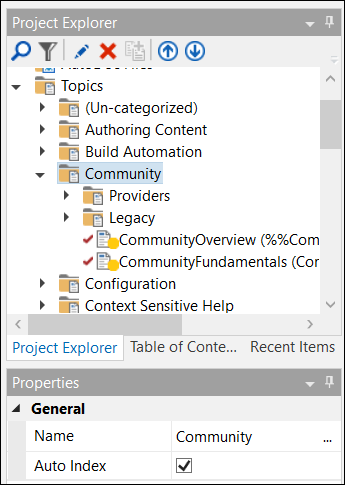
Index Entries
You can enable and disable the automatic secondary index keywords generation for individual Topic Categories as follows:
- On the Project Explorer, select the Topic Category for which you want to prevent the automatic generation of a secondary index keyword.
- In the Properties window, clear the Auto Index checkbox.
Creating Hierarchical Keywords
By default, keywords appear at the top level of the generated Index. You can create hierarchical keywords by using the | character. As an example, the following keyword:
Customer|Editing|Editing Customer Details
Appears in the generated Help System index as:
Customer
Editing
Editing Customer Details
You can include the same prefixes in multiple keywords. For example, the following two keywords, which could be defined in different Topics:
Customer|Editing|Editing Customer Details
Customer|Editing|Recording a Call
Appears in the generated Help System as:
Customer
Editing
Editing Customer Details
Recording a Call
Microsoft Help 2.x Links
When creating Microsoft Help 2.x systems, you can create two additional types of Index keywords in addition to those in the visible Index.
Associative Keywords allow you to assign keywords to Topics that you can use to create links from other Topics. As an example, you could assign an associative keyword to each Topic related to a specific concept in your Help System. You would then be able to create a Help 2 link using that keyword; at runtime the Help System would show a list of Topics matching the associative keyword when the link is clicked.
Context (F1) Keywords are used by Visual Studio to find Topics for the Dynamic Help window matching the current Visual Studio context. If you are developing Add-Ins, Designers, or Components for the Visual Studio IDE, you can contribute help context keywords. By defining matching Context Keywords in your Help System, you can provide your users with F1 or Dynamic Help content based on context.
Custom Properties, Table of Contents, and Tasks
Create a Custom Topic Property
- Click the Project Settings button on the Project tab.
- Under the Custom Properties section on Project Settings page, select Topic Properties.
- Click the New toolbar button to define a new Topic Property, including the default value.
Once the new Topic Property is defined, select one or more Topics in the Project Explorer and then define the value of your custom Topic Property in the Properties Window.
You can use the Topic Property anywhere in the Topic Content by surrounding the Property Name with %% characters - e.g. %%MyCustomProperty%%. When the Topic is output, the %%MyCustomProperty%% placeholder is replaced with the current value defined against the Topic for that property.
Add a Topic to the Table of Contents
Click the Add Sibling Node or Add Child Node toolbar button on the Table of Contents Editor. When the Project Link Designer dialog appears, select the Topic you want the new Table of Contents node to link to;
or
Select the Topic or Topics that you want to add to the Table of Contents on the Project Explorer. Drag and drop the Topics on to the Table of Contents editor in the desired location.
Mark a Topic as New in the Table of Contents
Highlighting new Topics in the Table of Contents makes it easier for users of your Help System to identify new content when you release a new version. HelpStudio provides a structured way to mark Topics as new in the Table of Contents.
By setting a date in the Build Profile Editor, HelpStudio automatically detects and marks new topics in the generated Table of Contents with a red check mark. If the Help System uses the light template, the word New appears on all new topics.
To Mark Topics as New using the Topic Creation Date
- Open the Build Profile Editor.
- Select New Content Highlighting option.
- Check the Automatically highlight new items checkbox.
- Select the date at which HelpStudio must consider the Topics as new.
- Select Use the Topic Creation Date to determine if a Topic is considered new option to automatically identify Topics changed or created since the date value you specified.
To Mark Topics as New using a Custom Topic Property
- Open the Build Profile Editor.
- Select New Content Highlighting option.
- Check the Automatically highlight new items checkbox.
- Select the date at which HelpStudio must consider Topics as new.
- Select Use a custom Topic property to determine if a Topic is considered new option.
- Select New Property button.
- On the New Property dialog, enter the Name as Change Date and select Property Type as Date & Time.
The modification date to be used in determining new Topics can now be set using the Change Date property.
To Mark Topics as New using Mark as New Option
- Go to Table of Contents Layout and select the topic you want to mark as new.
- In the Properties section, under Appearance, check the Mark as New checkbox.
In the generated Table of Contents, you see a red check mark or the word New on new topics based on the template.
Add a Task to a Topic
Select Tasks on the Topic Editor View bar and click the New button.
The Task that is created is now associated with the current Topic and is listed on the Task list in the current Topic.
You can view a project wide list of Tasks from the Tasks editor (Tools tab).