 Table of Contents
Images
HelpStudio allows you to insert images into topics and content snippets easily. The inclusion of images enriches the information provided on help pages and facilitates a more precise understanding for users. You can also add animated GIFs to topics and content snippets as you add a regular image.
HelpStudio supports the following types of image files:
- BMP
- JPG
- JPEG
- PNG
- GIF.
You can add images to your project in two ways:
- Add existing Image file: Use this option if you already have the image files saved on your computer.
- Capture Image: Use this option to capture a new screenshot.
Add Image to the Project Folder (Add existing Image file)
- Go to Content Authoring tab, select Image.
You can see all the images or choose to view only the fullsize or thumbnails by selecting the option under Show Image Type.
- On the Select Image dialog, select Add existing Image file.

- Choose the image you want to add and select Open.
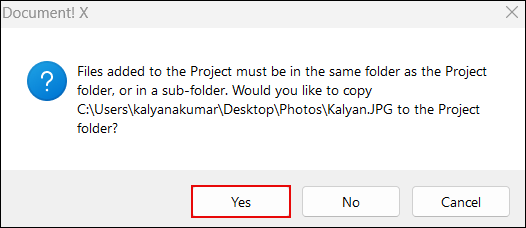
The images added to the project must be in the same local folder as the project folder or in a sub-folder. A prompt message appears if the images are not in the same local folder as the project folder.
- Select Yes.
If you select yes, the application creates a copy of the file in your project's local folder and includes it in the project. If you select no, the application does not create a copy.
The image is now added to the project folder and can be used in topics and content snippets.When you add an image to HelpStudio, it automatically places the image in an images folder under Other Files folder by default. But, you can create more folders, either at the same level or as subfolders.

Capture Image
The below section explains how to capture an image in HelpStudio project topics.
You can use the Capture Image option to take a screenshot of your screen and include the image file in your project without inserting it into topics or content snippets.- Go to Content Authoring tab, select Image.
- On the Select Image dialog, select Capture Image.
Image Capture dialog appears.
- Select the required option and select Capture.
The Image Capture dialog offers Capture When and Capture What options, enabling you to select when the capture occurs (immediately, after a specified delay, or via a defined hotkey) and what the target of the capture is (whole screen, a specific screen, active application window, specific application window, any window, and region).After capturing an image, a preview and options appear to save, save and edit, save and markup, save and insert, save and insert thumbnail, and discard and recapture.
- Select Save.
This action saves the captured image and completes the capture image process.
Define region to capture an image
To define an image capture region by dragging the red rectangle:
- Go to Content Authoring tab, select Image.
- On the Image Capture dialog, select Region.
- Select Define button.
The display shows a red rectangle that marks the region to be captured. To move the region, click and hold the left mouse button on the red circle in the center and drag it. You can also resize the region by dragging any of its sides or corners.
- Double-click the red circle to confirm the region selection, or press the Esc key to cancel.
- Select Capture button to capture.
After capturing an image, a preview appears with options to save, save and edit, save and markup, and discard and recapture.
- Select Save.
This action saves the captured image and completes the capture image process.
To define an image capture region by entering the dimensions:
- Go to Content Authoring tab, select Image.
- On the Image Capture dialog, select Region.
- Enter the dimensions of the required region in the Dimensions textbox.
- Select Capture button to capture.
After capturing an image, a preview appears with options to save, save and edit, save and markup, and discard and recapture.
- Select Save.
This action saves the captured image and completes the capture image process.
Insert an Image into a Content Editor (Design Screen)
- Open the Topic or Content Snippet file.
- On the Content Editor (Design Screen), place your cursor where you want to insert the image.
- Go to Content Authoring tab, select Image.
- Choose the image you want and select OK.
Insert an Image into a Content Editor (Drag and Drop Method)
- Open the Topic or Content Snippet file.
- Go to Project Explorer, Other Files, Images.
- Select and drag the image file from the Project Explorer to the place where you want it in the Content Editor and drop it.
- Select Save All.
Create a Thumbnail from an existing Image
- Go to Project Explorer, Other Files, Images.
- Select the image in the Project Explorer for which you want to create a thumbnail.
- Right-click on the image and select Create Thumbnail.
- If required, on the Create Thumbnail dialog, update the Size and Drop Shadow properties
- Select OK.
A thumbnail image (saved with the original filename suffixed with _thumb) is created and added to the project.
Replace an existing full size image in a Content Editor with a thumbnail
- Open the Topic or Content Snippet file.
- Right-click on the full size image in the Content Editor.
- Select Replace with Thumbnail from the right-click context menu.
A thumbnail version of the full size image is created and added to the project (if one does not already exist). The thumbnail replaces the full-size image as a clickable Dynamic Image widget that expands to show the full-size image when you click.
Find Unused Images
The find unused images tool in the HelpStudio searches your project for images that are not currently included in your project's content. You can then choose to remove these images from your project if you are sure that they are not required.
- On the Tools tab, select Find Unused Images.
After the tool finishes searching, it shows you a list of unused images.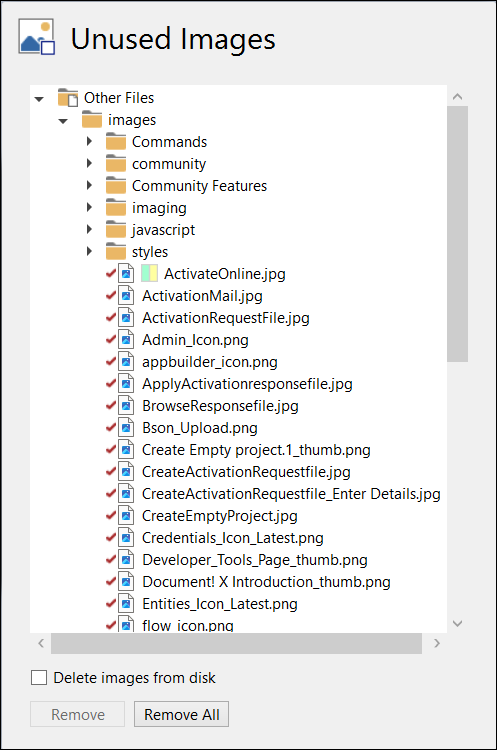
- Select the images that you want to remove from your project.
- Check the Delete images from disk checkbox if you want to remove the images from the project folder.
- Select the method based on your requirements to remove the unused images:
- Select Remove to remove only the selected unused images.
- Select Remove All to remove all the identified unused images.