 Table of Contents
Localization in HelpStudio Suite
HelpStudio Suite is the only mainstream Tool that allows you to author multiple languages within a single project.
Define your Topics, Table of Contents, and Index Keywords once and manage each language you wish to localize to within the same project. Easily switch between locales and track localization tasks all from within HelpStudio Suite.
Localization Fundamentals
Add a secondary locale to the Project
- On the Project ribbon tab, click the New Locale button.
- On the displayed dialog, choose the Locale that you wish to add to the project.
- Click Ok and the new Locale is added to the Project.
Switch between locales
To switch to another locale, use the Current Locale dropdown on the Project ribbon tab.
When you switch to another locale, Titles on the Project Explorer and Table of Contents Editor are shown in that locale and any new editors or project tools you open will open in that locale. The Properties window also shows localizable properties in the current locale.
Localization Issue Indicator
When you are working in a secondary locale and a localization for the current locale cannot be located, HelpStudio displays a localization issue indicator next to the text from the Primary Locale so that you can easily spot the problem.
Localization Issue Indicator on the Project Explorer
Localization Issue Indicator in the Properties Window
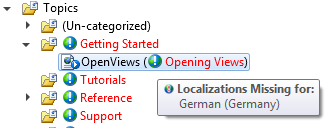
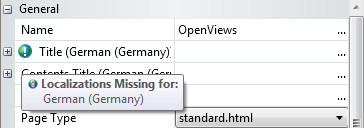
Hover your mouse over the localization issue indicator to see a list of locales with missing or out of date localizations.
Open a Topic for edit in a specific locale
To open a Topic for edit in a specific Locale without changing the current locale, right-click on the Topic in the Project Explorer and select the required Locale from the Edit (Other Locale) sub-menu.
The Topic Editor opens for the chosen Locale.
Open a Content File for edit in a specific locale
To open a Content File for edit in a specific Locale without changing the current locale, right-click on the Content File in the Project Explorer and select the required Locale from the Edit (Other Locale) sub-menu.
The Content File Editor will open for the chosen Locale.
To build an output for a secondary locale
- Click the Build button on the Project ribbon tab.
- Select the secondary locales you wish to build.
- Click the Start Build button.
To check for outstanding localization work
As you make changes to localizable content in your HelpStudio project, the change date is recorded. This enables HelpStudio to track which secondary locale content is out of date with respect to the Primary Locale.
You can view the list of outstanding localization work in the Project Locale Editor:
- On the Project Explorer, select the secondary locale you wish to view outstanding localization work for.
- Click the
 Project Explorer toolbar button.
- The Project Locale Editor will be opened for that locale.
- Select the Localization Report page.
- Click the Execute button.
- A list of localizable content which has been modified in the Primary Locale more recently than the secondary locale will be displayed.
Navigation Bar
When you open an item from the results grid, a Navigation Bar opens above the document tab area:
Example Navigation Bar

The navigation bar facilitates seamless navigation through the items on the results grid.
- Select the < button to move to the previous item in the results grid.
- Select the > button to move to the next item in the results grid.